How to Add Featured Image in Blogspot?
Do you believe Blogspot users can use featured image on their blog posts?
In Blogspot, adding a featured image to your blog post is a straightforward
process. Here's a step-by-step guide on how to use a featured image in a
Blogspot post:
After reading this step by step process, you will be able to use featured
image/post thumbnails in your blogspot posts.
What is Featured Image in blogspot Post?
In Blogger, the term "featured image" is not a native or built-in concept
like it is in some other content management systems (CMS) or blogging
platforms. Blogger, owned by Google, does not have a specific feature
labeled as "featured image" within its platform.
However, many Blogger users still use a prominent image at the beginning of
their blog posts to act as a visual representation of the content or to make
the post more appealing when shared on social media.
Benefits of Adding a Featured Image:
Adding a featured image makes your blog look more attractive.
- A catchy featured image increase CTR (Click Through Rate),
- Blog posts with post thumbnails are appealing.
- Adding a featured image indirectly improve SEO.
- Featured Image helps boost Social engagement.
Let us know, how you can add featured image in Blogger.
How to add Custom Featured Image in Blogspot?
Here's how you can incorporate a featured image in blogspot:
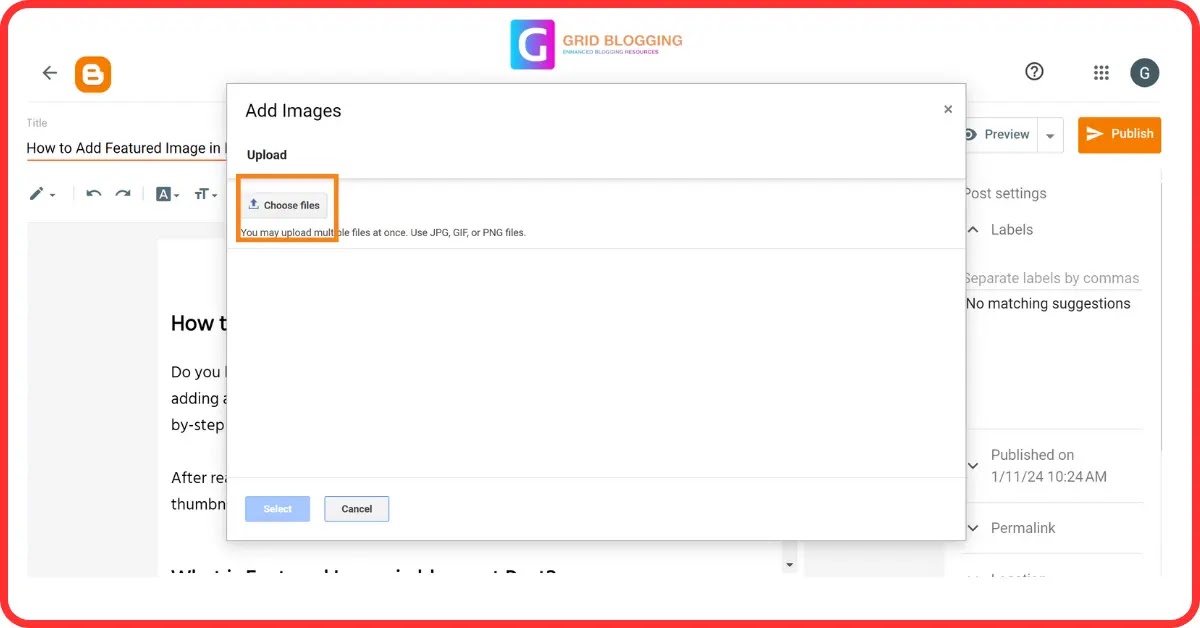
Step 1: Add an Image at the Beginning of Your Post:
First, you have to add an image at the begaining of your blogspot post.
When you create or edit a blog post in Blogger, you can manually insert an
image at the beginning of the post using the post editor. This image will
serve as a featured image of your blogspot post. Follow the
instruction-
Step 2: Get the image address
You have to collect the image address of which you want to see as feature
image in your blogspot post. To get the image address, follow the the below
instructions-
Step 3: Paste Image Address in the below code
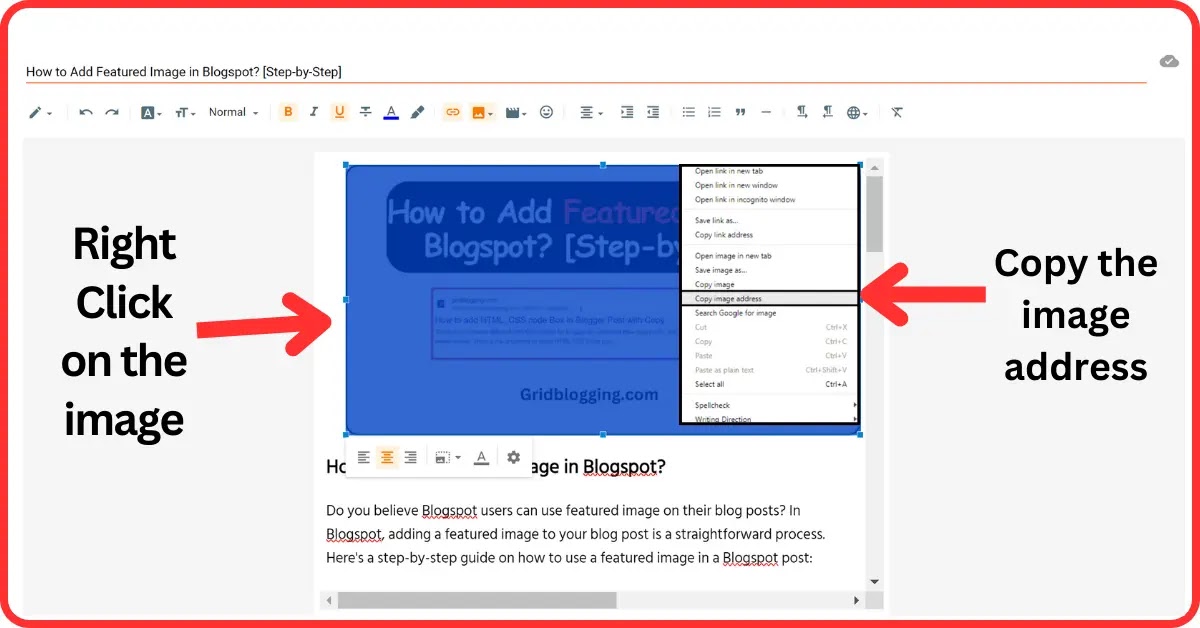
- Once you upload the image into the Blogger post editor, next you have to right click on your image and Copy Image address as shown in the below image.
<img src="image-URL" style="display:none;">
- In the above code replace the image-URL with the Image address you have copied in Step 2. After you add the image address in the above code, it looks like this:
<img src="https://blogger.googleusercontent.com/img/b/R29vZ2xl/AVvXsEjNBRjk7OUN8UUACqLGpGuxmolqK2VXA1IgTl2CF6kdx2T2_Bzo7SPsK-qskjG3UKTGlL3l3sGtfS9SIirDVUQ2JiBPrsmHnakHeT7T09TGCGyM2RuoumjkagXll7Csm4TAex0PANJxNC6s/s400/Screenshot+%25281408%2529.png" style="display:none;">
The red link in the above code is image address. Follow the last step
& let’s finish.
Step 4: Add HTML Code to Blogger Post
In the last step, you have to copy the above HTML code (you have made in
Step 3) in the HTML section of Blogger post editor. Follow the below
sub-steps:
- Visit Blogger >> Posts >> Edit any post >> Click on HTML
- After you click on HTML, you will get a large HTML code. You just have to paste the above HTML code (the code you have made in Step 3) at the top of this code.
- Finally, hit the publish button & you have successfully set your custom featured image in Blogger.
Conclusion:
As we have seen you can easily add custom featured image in Blogger by following 4 simple steps. I hope you love this Step-by-step guide.
If you have really learned something new, leave a comment to let me know. Appreciate my efforts by sharing this post.
See you soon with a new post!


